 Skip to content
Introduction
Turning a 55-gallon drum into a DIY compost tumbler isn’t just a weekend project—it’s a game-changer for organic gardening and sustainable living. This guide walks you through creating a high-performance composter that accelerates decomposition, saves money, and reduces landfill waste. Perfect for eco-conscious gardeners, this 1500-word tutorial ensures your tumbler dominates both kitchen scraps and yard debris.
Table of Contents
Key Takeaways
- ✅ DIY compost tumblers decompose waste 3x faster than traditional piles.
- ✅ Total cost: 101–101–250 (vs. 150–150–400 for store-bought models).
- ✅ Tools required: Cordless drill, jigsaw, rivet gun, and safety gear.
- ✅ Sustainable gardening hack: Repurpose food-grade drums for zero-waste success.
- ✅ Yield: Convert 100 lbs of scraps into nutrient-rich soil in 4–6 weeks.
1. Why Build a DIY Compost Tumbler? Unveiling the Key Benefits
Accelerated Decomposition Process
DIY compost tumblers turbocharge breakdowns through constant aeration. By spinning the drum daily, oxygen fuels microbes that devour organic waste 2–3x faster than static bins.
Cost-Effective Garden Solution
You can make a DIY compost tumbler from common materials, often for the same price as store-bought ones. Building your own lets you create a strong, tailored solution for your garden.
Environmental Impact
The EPA reports that 30% of household waste is compostable. A DIY compost tumbler diverts this from landfills, cutting methane emissions and creating chemical-free fertilizer for organic gardening.
| Composting Benefits | Description |
|---|---|
| Nutrient-Rich Soil | Compost gives plants the nutrients they need, making soil better for growth and water. |
| Waste Reduction | Composting keeps organic waste out of landfills, cutting down methane and saving space. |
| Cost Savings | Homemade compost can save money on expensive fertilizers and soil fixes. |
| Environmental Benefits | Composting supports green gardening and cuts down on chemical use. |
DIY compost tumblers offer many benefits for organic gardening. They help make gardening more sustainable and eco-friendly.
2. Tools & Materials: Your DIY Compost Tumbler Checklist
Essential Power Tools
- Cordless drill & bit set (for 1/4″ ventilation holes)
- Jigsaw (cutting door openings and PVC piping)
- Rivet gun (securing aluminum reinforcements)
Must-Have Building Materials
- 55-gallon polyethylene drum (food-grade, non-toxic)
- Treated 2×4 lumber (for weatherproof support frames)
- 4″ PVC pipe (durable axle for smooth rotation)
- Stainless steel hinges/latches (rust-resistant hardware)
Pro Tip: Source drums locally from car washes or farms for 0–0–20!
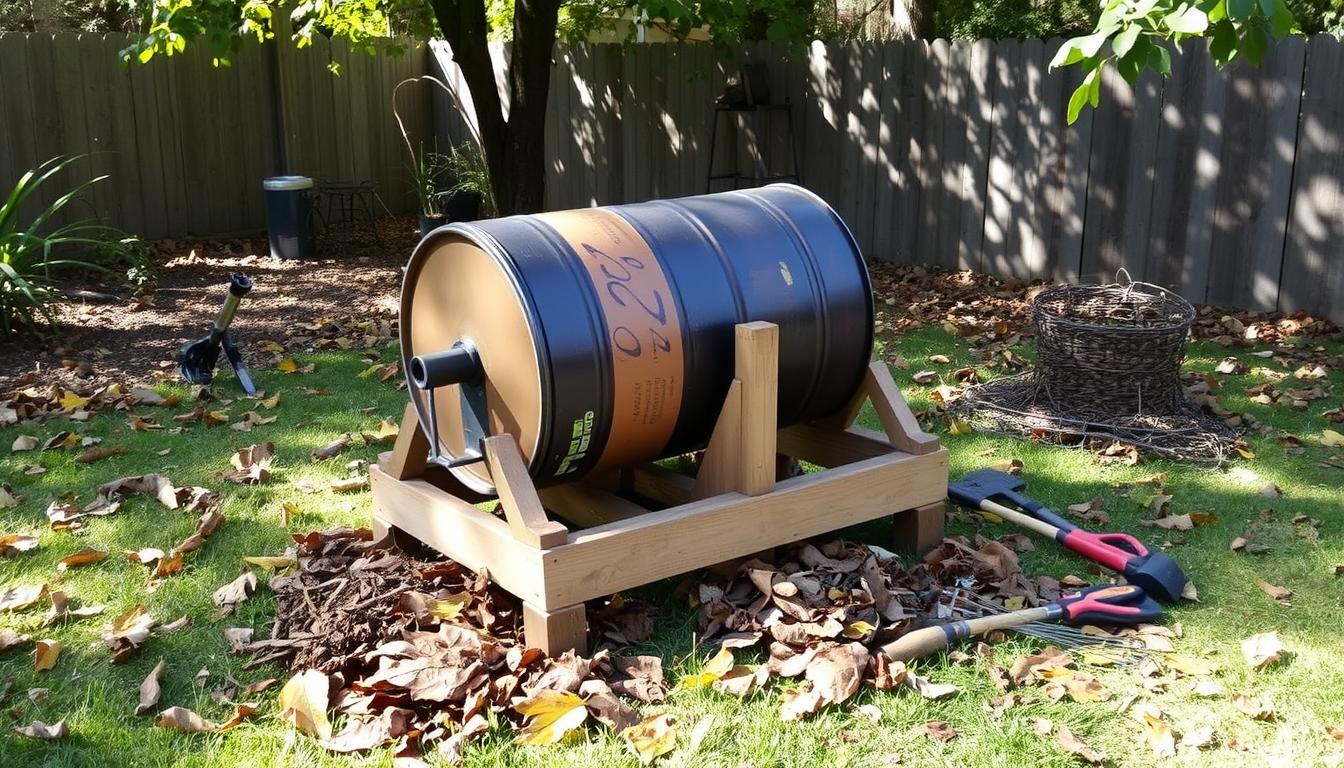
3. Choosing the Perfect 55-Gallon Drum for Your DIY Tumbler
Drum Safety 101
Avoid chemical residues! Scrub used drums with baking soda and vinegar. For new builds, FDA-approved polyethylene drums resist corrosion and pests.
Reinforcement Techniques
Strengthen door openings with 1-inch aluminum strips riveted around edges. Double-layer hinges prevent sagging under 200+ lbs of compost.
4. Step-by-Step Drum Prep: From Cleaning to Reinforcement
Drill Ventilation Holes
Create 20+ 1/4″ holes spaced 2″ apart for airflow.
Cut the Access Door
Use a jigsaw to carve an 18×20″ door (slightly smaller than a wheelbarrow bed).
Install Mixing Fins
Attach galvanized steel fins internally to churn materials with each spin.
5. Building the Ultimate DIY Compost Tumbler Frame
Construct a heavy-duty support stand using:
- 4×4 pressure-treated posts (anchored in concrete)
- 3″ casters (for mobility on uneven terrain)
- 4″ PVC axle (lubricated with food-grade grease)
Bonus: Add a hand crank for effortless turning!
6. Ventilation & Drainage: Engineering Optimal Airflow
| Hole Size | Spacing | Purpose |
|---|---|---|
| 1/4″ | 2″ | Aeration |
| 1/2″ | 6″ | Drainage |
7. Installing the Turning Mechanism for Effortless Mixing
- Axle Assembly: Thread a 4′ steel rod through PVC pipe centered on the drum.
- Mixing Fins: Bolt L-shaped aluminum angles inside to lift and drop compost.
- Hand Crank: Attach a bike handlebar for ergonomic spinning.
Pro Tip: Spin your Homemade compost tumbler 3x weekly for even decomposition.

8. Pro Tips: Loading Ratios, Maintenance, and Troubleshooting
Ideal Compost Recipe
- Greens (30%): Veggie scraps, coffee grounds, fresh grass
- Browns (70%): Shredded cardboard, dry leaves, sawdust
Moisture Management
Squeeze a handful—drips mean it’s too wet (add browns). Crumbliness? Add water.
Winter Care
Insulate with bubble wrap and relocate to a sunny spot to keep microbes active.
9. FAQs: Your DIY Compost Tumbler Questions Answered

Q: How often should I turn my DIY compost tumbler?
A: 3–5x weekly for fastest results.
Q: Can I compost meat/dairy in a tumbler?
A: Avoid them—they attract pests and slow decomposition.
Q: Why isn’t my compost heating up?
A: Likely low nitrogen. Add more greens like coffee grounds or manure.
Conclusion: Join the Sustainable Gardening Revolution
Your DIY compost tumbler isn’t just a bin—it’s a statement. By transforming waste into nutrient-rich soil, you’re closing the loop on sustainable living while nurturing gardens naturally. Ready to revolutionize your green routine? Grab that drum, drill, and determination—it’s time to build!
